We got chickens.
Well, real life teeny, tiny baby chicks to start.
I am in the kitchen, making Nana Muffins (French Breakfast Puffs), for Ellie for the umpteenth time in her little life, and while breaking the egg to stir in the batter, the shell shatters. I mean a million-pieces-shatters. I say some very unladylike words and begin to pull the shards out of the batter.
Meanwhile, Matt is listening. And thinking, as he is often wont to do.
...
A long time ago, I had briefly mentioned the idea of having chickens. A coworker has some, numerous families I know raise their own meat and eggs, and it seems almost that our city suggests it. The Springs animal ordinance allows for ten (10!!) pullets, but no roosters.
So, after hearing my rant about the brittle eggs ruining my batter, Matt comes to me with an idea. What if - I mean, what IF we got chickens.
I am certain the look of utter surprise at this suggestion coming from my husband almost turned him off the idea. Matt has many a great idea, but generally, raising livestock is not one of them.
...
After some intensive research, pricing out coop-building supplies at Lowes vs. purchasing a coop from Costco, and... well, really, just diving in. We checked what the city ordinance allowed, and what to expect from raising chickens. Other than that, we really just threw caution to the wind and went for it. Which isn't really like us. I'm very methodical about my purchases: Checking prices, variety, ideologies, pedagogues, theologies before I make a firm decision.
We found a wholesale chick supplier on Craigslist with a great reputation. She ordered chicks as they are requested, and after researching the breeds she has, we chose two Cinnamon Queens (Ruby and Henrietta) and a Blue Cochin (Buffalo). We paid $6 a piece for the two-day-old chicks, and brought them home in a plastic box three days ago.
Good golly, are they ever cute. And LOUD. LOUD LOUD LOUD. The first thing we did when we got home was to put Ellie in the bathtub with them. They had a lot to say about that event, and the nature of our bathroom lends itself to a magnifying of the noise.
We bought a pretty standard, albeit adorable, coop from Costco as the cost of a ready-made coop was on par with the supplies we would have bought from Lowes without instructions. We dropped off at Circle R and picked up some feed. At Petco we got some cedar bedding, a cat water bottle, and a heat lamp.
All told, this is a pretty expensive venture - $180 (plus tax) for the coop, $18 for the chicks, $50 for miscellaneous supplies. But, the excitement on Ellie's face and the intense interest June gives the chicks is proving to be worth it!
Friday, March 28
Tuesday, July 24
Side Pantry-Smantry
This I have learned about myself: If I can't get it done within the time my daughter is napping, it is a lost cause. Not only because a toddler requires all of your attention, all of the time, but because I have the attention span of a toddler.
Today's Crafternoon/evening was this delicious side pantry. I'd seen a couple version on Pinterest, but died when I saw this one. Chevron?! Adorable dowel bars for added security? It was too much. I needed to make one. And thus my afternoon changed for the better.
To begin, I didn't do any research about sizes, materials and/or dimensions other than to sketch out a preliminary design from what I'd seen online. After checking measurements and editing the design it came down to this:
66" tall by 33" wide by 6" deep, 5 shelves, and four casters.
The actual dimensions of the pantry interior 29" wide by 11" tall, with the bottom shelf being about 9" tall.
A list of supplies:
(4) 2x6x8
(5) 3/4" Dowels
(4) Casters
(1) White Back Board
(1) Drawer Handle
Because Matt and I rarely do wood projects, we needed to buy some screws of various sizes. I used 3" wood screws for the framing of the pantry and 3/4" screws for the backboard and the casters.
Okay, time to put the pictures where my mouth is.
I have precisely ZERO sawhorses. If I ever do another project of this magnitude, I will be investing in a couple. And some vice grips. Definitely vice grips.
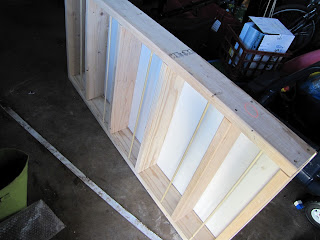
I started by building the right side of the frame, screwing in and stabilizing the top of the pantry with two 3" wood screws. From there, I measured down 13" and marked off each shelf. From there, I drilled pilot holes on either side for the shelf screws.
This is what happens when you are a novice, like me. I ended up with these buggers all the way down the plank. So I unscrewed the top, flipped it around, and had these on the inside of the pantry, so you'd never be able to tell. :)
Drill slowly, and don't force the bit the way I did and you should avoid these.
What it should look like on the outside. I see a toe!
This picture is a little misleading. I was using the other side plank as a stabilizer as I was screwing in the shelves. Apparently nothing on our property is level. Ever. Anywhere.
Gator loved "helping." I let her put her hand on top of the drill while I was attaching the shelves. You'd think she had died and gone to Heaven. Hey, we all start somewhere, right?
Next, the dowels. I measured up 3" from each shelf and drilled a hole with the 3/4" bit about 1/2" down. Each dowel was cut to 30" to give it a half inch to fit on either side. That way there's no fear if it falling out. Remind me to tell you about the fun we had with our bed slats...
Once all of the holes had been drilled, the top went on, and I used the mallet to make sure everything was snug. This process took a half hour at least. The holes weren't deep enough, the holes weren't deep enough, the side plank wouldn't stay without Matt's help, ad nauseum.
Then came the backboard. It was an 1 1/4" too big! GAHHH!! And the drill battery died! And it was 9:30pm! And I was staaaaaanky. So it got shut in the garage until this morning. Okay, so powered through the 1 1/4" excess with the skill saw, and then screwed on the back with 3/4" screws. One in each diagonal corner until it was secured and even, then a few around the outside to make sure it looked nice and one through the middle of each shelf to keep it flush.
Looking good!
Now, four casters, spaced apart to keep it upright. Although, it will not stand on its own. Doesn't matter though, as it is tucked beside the fridge.
Can I tell you how much I hate painting right now? After the dining/living room and the entertainment stand, I am painted out. Forever.
Bring it inside, all by your Woman Power Self.
Get a little wild and leave all of your tools and paint out in the sun. Because dang it, this is exciting!
Today's Crafternoon/evening was this delicious side pantry. I'd seen a couple version on Pinterest, but died when I saw this one. Chevron?! Adorable dowel bars for added security? It was too much. I needed to make one. And thus my afternoon changed for the better.
The Backside will be getting the chalkboard treatment when I no longer loath paint. |
Don't mind our photos. Or do. I don't really care. |
To begin, I didn't do any research about sizes, materials and/or dimensions other than to sketch out a preliminary design from what I'd seen online. After checking measurements and editing the design it came down to this:
66" tall by 33" wide by 6" deep, 5 shelves, and four casters.
The actual dimensions of the pantry interior 29" wide by 11" tall, with the bottom shelf being about 9" tall.
A list of supplies:
(4) 2x6x8
(5) 3/4" Dowels
(4) Casters
(1) White Back Board
(1) Drawer Handle
Because Matt and I rarely do wood projects, we needed to buy some screws of various sizes. I used 3" wood screws for the framing of the pantry and 3/4" screws for the backboard and the casters.
Okay, time to put the pictures where my mouth is.
I have precisely ZERO sawhorses. If I ever do another project of this magnitude, I will be investing in a couple. And some vice grips. Definitely vice grips.
I started by building the right side of the frame, screwing in and stabilizing the top of the pantry with two 3" wood screws. From there, I measured down 13" and marked off each shelf. From there, I drilled pilot holes on either side for the shelf screws.
This is what happens when you are a novice, like me. I ended up with these buggers all the way down the plank. So I unscrewed the top, flipped it around, and had these on the inside of the pantry, so you'd never be able to tell. :)
Drill slowly, and don't force the bit the way I did and you should avoid these.
What it should look like on the outside. I see a toe!
This picture is a little misleading. I was using the other side plank as a stabilizer as I was screwing in the shelves. Apparently nothing on our property is level. Ever. Anywhere.
Gator loved "helping." I let her put her hand on top of the drill while I was attaching the shelves. You'd think she had died and gone to Heaven. Hey, we all start somewhere, right?
Next, the dowels. I measured up 3" from each shelf and drilled a hole with the 3/4" bit about 1/2" down. Each dowel was cut to 30" to give it a half inch to fit on either side. That way there's no fear if it falling out. Remind me to tell you about the fun we had with our bed slats...
Once all of the holes had been drilled, the top went on, and I used the mallet to make sure everything was snug. This process took a half hour at least. The holes weren't deep enough, the holes weren't deep enough, the side plank wouldn't stay without Matt's help, ad nauseum.
Then came the backboard. It was an 1 1/4" too big! GAHHH!! And the drill battery died! And it was 9:30pm! And I was staaaaaanky. So it got shut in the garage until this morning. Okay, so powered through the 1 1/4" excess with the skill saw, and then screwed on the back with 3/4" screws. One in each diagonal corner until it was secured and even, then a few around the outside to make sure it looked nice and one through the middle of each shelf to keep it flush.
Looking good!
Now, four casters, spaced apart to keep it upright. Although, it will not stand on its own. Doesn't matter though, as it is tucked beside the fridge.
Can I tell you how much I hate painting right now? After the dining/living room and the entertainment stand, I am painted out. Forever.
Bring it inside, all by your Woman Power Self.
Get a little wild and leave all of your tools and paint out in the sun. Because dang it, this is exciting!
Sunday, April 22
Chocolate Sauce
I am a huge fan of ice cream. The worst kind of fan; secretly eating half the carton, selfishly so. But I lead myself to believe it is because no one else will enjoy it as much as I do. Or that they really don't want any. Which is mostly true...
Anyway. Chocolate sauce is ridiculously expensive for what it is. I mean, cocoa powder with some sugar costs $4 for an 8 oz jar? I pay less for my beauty cream. Which explains a lot, n'est pas?
Enter my do-it-a-own abilities. For about $2, I made a delicious vat of rich, dark chocolate sauce in about five minutes.
Away we go.
Ingredients:
1.5 cup sugar
3/4 cup cocoa
1 cup of water
dash of salt
squirt of vanilla
Step One: Stir the sugar and cocoa together in a pot. This is very important. If you try to mix the cocoa in directly with the water in the next step, it will float to the surface in clumps and you will have a devil of a time trying to submerge it and make it into something edible.
Step Two: Over medium/high heat, slowly stir in the water.
Step Three: Boil the mixture until the sugar looks like it is mostly dissolved. Should be about 5-10 minutes. Mine was quick, but being at 6500', I can't be a super reliable source for exact cooking times.
Step Four: Remove the mixture from the heat and add vanilla.
Step Five: Do not let anyone else eat any, as they will not understand the time and effort you have put into this creation.
Mix it with peanut butter. Add some coconut, some nuts, some... ummm... someping else (as Gator says). Eat with Rice Krispie Treats, over ice cream, with apples and other good for you crap.
Saturday, March 24
A Beum Beum for Gator
This post is a long time coming. After seeing this redux of a Cozy Coupe, I could not wait to get my hands on one to refine for Gator. I searched Craigslist for a good month, only finding ones for $30 or more. I am cheap. Very cheap.
Luckily, I happened to check the free ads and found a Cozy Coupe pickup!
Although it didn't look nearly as nice.
It was missing it's gas cap, the front wheels were pigeon-toed and the steering wheel and side mirrors were chewed into oblivion by some large animal. Probably a rabbit.
I found replacement parts on Little Tikes' website for a few dollars (although shipping essentially tripled the price) and waited patiently until they arrived to start. Gator's Papa has an old Ford that he reconditioned himself. We took that as the inspiration and ran with it.
Matt and I started by removing the steering wheel and what was left of the gas cap.
We took a medium-fine grit sandpaper and roughed up the chew marks, then polished them with a fine grit to even it out.
Next came the spray painting. Papa's truck is a beautiful metallic blue with silver detailing. Three cans of spray paint for plastic later, this is what it began to look like:
Sadly, I didn't take pictures of taping off the bumper, or the detailing we did to the headlights, but this is the final product:
You can hardly see the chew marks!
The finishing touch was the add the license plate from eBay.
Subscribe to:
Posts (Atom)