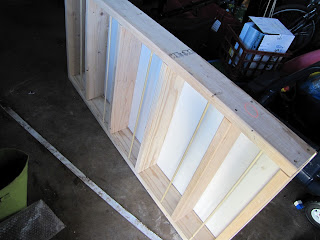
Today's Crafternoon/evening was this delicious side pantry. I'd seen a couple version on Pinterest, but died when I saw this one. Chevron?! Adorable dowel bars for added security? It was too much. I needed to make one. And thus my afternoon changed for the better.
 |
| The Backside will be getting the chalkboard treatment when I no longer loath paint. |
 |
| Don't mind our photos. Or do. I don't really care. |
To begin, I didn't do any research about sizes, materials and/or dimensions other than to sketch out a preliminary design from what I'd seen online. After checking measurements and editing the design it came down to this:
66" tall by 33" wide by 6" deep, 5 shelves, and four casters.
The actual dimensions of the pantry interior 29" wide by 11" tall, with the bottom shelf being about 9" tall.
 A list of supplies:
(4) 2x6x8
(5) 3/4" Dowels
(4) Casters
(1) White Back Board
(1) Drawer Handle
Because Matt and I rarely do wood projects, we needed to buy some screws of various sizes. I used 3" wood screws for the framing of the pantry and 3/4" screws for the backboard and the casters.
Okay, time to put the pictures where my mouth is.

I have precisely ZERO sawhorses. If I ever do another project of this magnitude, I will be investing in a couple. And some vice grips. Definitely vice grips.
I started by building the right side of the frame, screwing in and stabilizing the top of the pantry with two 3" wood screws. From there, I measured down 13" and marked off each shelf. From there, I drilled pilot holes on either side for the shelf screws.

This is what happens when you are a novice, like me. I ended up with these buggers all the way down the plank. So I unscrewed the top, flipped it around, and had these on the inside of the pantry, so you'd never be able to tell. :)
Drill slowly, and don't force the bit the way I did and you should avoid these.

What it should look like on the outside. I see a toe!

This picture is a little misleading. I was using the other side plank as a stabilizer as I was screwing in the shelves. Apparently nothing on our property is level. Ever. Anywhere.

Gator loved "helping." I let her put her hand on top of the drill while I was attaching the shelves. You'd think she had died and gone to Heaven. Hey, we all start somewhere, right?

Next, the dowels. I measured up 3" from each shelf and drilled a hole with the 3/4" bit about 1/2" down. Each dowel was cut to 30" to give it a half inch to fit on either side. That way there's no fear if it falling out. Remind me to tell you about the fun we had with our bed slats...

Once all of the holes had been drilled, the top went on, and I used the mallet to make sure everything was snug. This process took a half hour at least. The holes weren't deep enough, the holes weren't deep enough, the side plank wouldn't stay without Matt's help, ad nauseum.

Then came the backboard. It was an 1 1/4" too big! GAHHH!! And the drill battery died! And it was 9:30pm! And I was staaaaaanky. So it got shut in the garage until this morning. Okay, so powered through the 1 1/4" excess with the skill saw, and then screwed on the back with 3/4" screws. One in each diagonal corner until it was secured and even, then a few around the outside to make sure it looked nice and one through the middle of each shelf to keep it flush.

Looking good!

Now, four casters, spaced apart to keep it upright. Although, it will not stand on its own. Doesn't matter though, as it is tucked beside the fridge.

Can I tell you how much I hate painting right now? After the dining/living room and the entertainment stand, I am painted out. Forever.
Bring it inside, all by your Woman Power Self.
Get a little wild and leave all of your tools and paint out in the sun. Because dang it, this is exciting!


